My current notebook, MSI GX633 turned 2 years old by this March. In past months, the notebook run pretty hot that it’s not even possible to run everything at maximum. A more intense task like video playback would raise the temperature to more than 90 degrees Celcius. I can’t even use the maximum clock (the processor run at 550 Mhz, 1.1 Ghz and 2.2 Ghz), so I’m limiting it to the middle clock, and even so it still heat that much.
I have tried a few solutions to solve this overheating issue, first is undervolting. It’s kind of challenge to find which tools that can undervolt AMD Turion X2 processor, and I found K40Stat worked for me. I was hoping this could solve the overheating, but it’s not. I always get BSOD at the end. The next solution I tried is buying a laptop cooler (opted for Targus model), but it didn’t help much either. In the end, I could only run half the clock of the processor to prevent it from overheat.
In general, overheating is caused by accumulated dust on the air intake and outtake, blocking off the ventilation. Even though the solution is simple, by cleaning the fan and the ventilation, but it require me to open the notebook cover. Since this is my only work computer, I’m always avoiding this but I finally build up the courage to do it as the heat is unbearable anymore. Read on to find out how I clean my fan and solve the overheating issue. 🙂
Opening the cover and find the fan
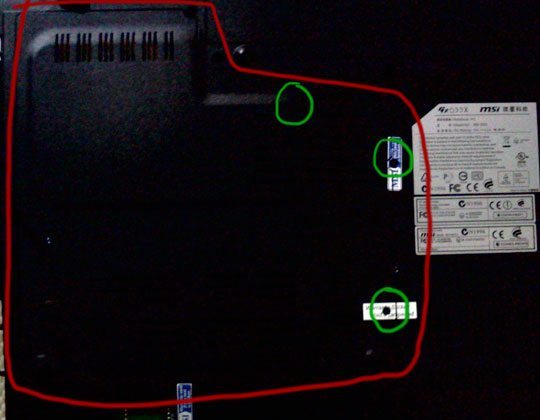
First, we locate where the fan is placed. On my notebook, it is on the upper right side (or left if viewed from bottom). Then we have to open the plastic plate on the back that covering most of the hardware inside, including the fan.

In the picture above, you can see that the cover we have to open is marked with red line. The green circle marked the 3 screws protecting the cover. Take out these screws, the cover can be opened easily, it require a bit force on the first time though. Opening the cover reveal the hardware inside. Note that the warranty sticker is covering 2 of the 3 screws, so it will void your warranty if you decide to open it.
Note: If you are doing this on other notebook and have difficulties opening the back cover, check out for any missing screws. I have trouble with this at first too as one of the screw is hidden behind the warranty sticker. You might need a bit force on opening it but if it shouldn’t stick.

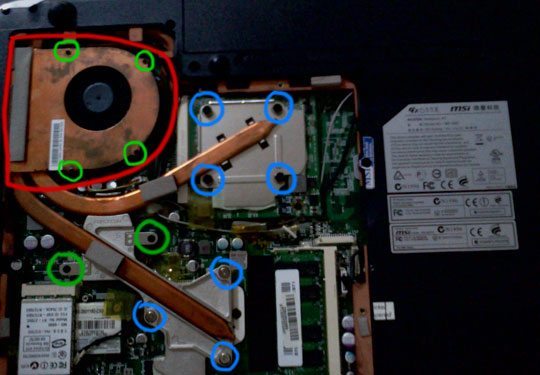
Finally, we see the fan, I marked it with red line in picture above. The orange metal which covered the fan and goes around to the middle, is part of the heat sink. To clean the fan, we have to remove the heat sink. There is many of screws here as you can see.
In the middle, there is 4 screws (marked with blue circle), this should be where the processor is. In the bottom, there is 3 screws (again with blue circle), this seems to be the GPU. Note that these screws couldn’t be taken out. Next to it, there is another 2 screws (marked with green circle), this screws can be taken out unlike the others. This is all screws that connected the heat sink to the mainboard.
On the left top, there is another 4 screws (marked with green circle) that is connecting the heat sink with the fan. These screws is smaller than any other screws, so be careful to not lose it. Remove these screws and the heat sink will be able to taken out completely.
Note: Removing the heat sink is a little hard as well even after all the screws disconnected. So this step should be done very carefully, do not force it too much. Fan is still connected by cable to the mainboard, so we can’t remove it, only the heat sink.

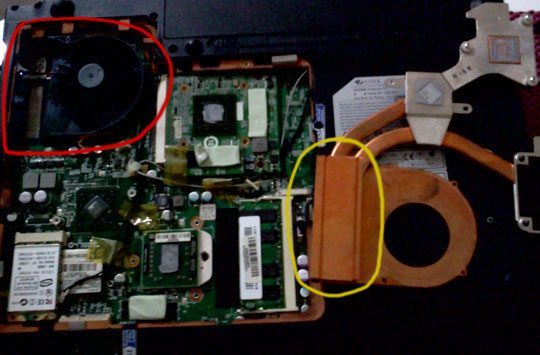
Now the heat sink is completely removed, the fan is revealed. It’s time to do the cleaning. 🙂
The dust is mostly accumulated on the fan (marked with red in picture above) and the vents of the heat sink (marked in yellow). You can use brush, cotton bud, compressed air or any other tools you have to clean the dust.
After cleaning is done, we have to place everything back. This should be easier as we just revert everything we did so far.
Results
After cleaning off the dust, my notebook is finally run like new again. Before I clean it, the temperature could reach more than 90 degrees while still clocked in 1.1 Ghz. After the clean, it won’t even reach 80 degrees anymore at full 2.2 Ghz. Admittedly, the notebook is actually running pretty hot but it won’t slow down until it reaches 90 degrees, which means that after cleaning, I don’t have any slow down anymore and can run at full speed. 🙂
Thank you for reading. Hope that could help any MSI GX633 users out there and might serve as some reference for other notebooks.
2 comments | Leave a comment